Tuesday, March 24, 2009

Turn off and Unplug

Earth Hour is fast approaching. Have you made plans for Saturday, March 28, from 8:30 - 9:30? If you're near New York City, take a look at the skyline. If you're in Vegas, visit the strip! If you're at home, turn off your lights and enjoy a nice candlelit dinner or any other variety of activities you can do to reduce your carbon footprint. Last year, Mr. Green and I unplugged virtually everything and enjoyed the company of friends by candlelight. We plan to do the same this year. Even if you plan to be out and about, turn off and unplug everything before you leave, to do your part!


Click here if the video does not work for you.

More than 1,400 cities and towns in 80 countries are taking action to reduce their carbon footprint. If you are going to vote with your light switch, sign up and be counted!


Monday, March 23, 2009

Crockpot Vegetable Stock

Back to the "waste not" theme from yesterday ... I recently read an article that changed my world pertaining to food waste. It's a simple concept: Dedicate a freezer container to clean vegetable scraps and, when the container is full, turn it into stock.

Changed. My. World.

Now, I probably get that bag out of the freezer twice a day to contribute some scraps and the bag was full in about two weeks. My first attempt at achieving a flavorful vegetable stock was a success, and waaaay too easy! I love to use stock as a low-fat and no-sugar way to flavor grains by substituting stock for water and butter or oil.

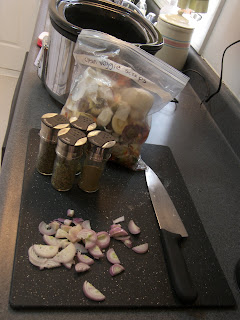
For good measure, I sauteed some shallots in olive oil beforehand just in case, added my cheapskate version of a bouquet garni (tossed in dried marjoram, rosemary, thyme, bay leaf without the cheesecloth), 8 peppercorns, and enough water to cover the vegetables.


The first bag contained:
  • Tomato stems and cores
  • Red pepper stems, seeds, and that white stuff on the ribs
  • Butternut squash skins
  • Outer layers of onions, garlic, shallots
  • Avocado pit

After 8 hours, I pulled the solids from the pot, pushed the water out of them using a colander,

and had a delicious stock. Be sure to cool it down quickly before putting it in the fridge or freezer! I use freezer packs and a few ice cubes.


When saving scraps, DO include:
  • Onion peels (will give it a darker color)
  • Garlic ends
  • Stems of leafy greens
  • Carrot tops and greens
  • Apple and pear cores
  • Stems of fresh herbs
  • Turnip and parsnip peelings
When saving scraps, DO NOT include:
  • Bitter or waxy plant parts, such as cucumber peels, stone fruit pits, or citrus peels (oops! I had an avocado pit in there, but it seemed to do no harm)
  • Potatoes (they do not freeze well)
  • Anything moldy
An additional bonus with vegetable stock is that you won't have to fuss over separating the fat from the stock, because there is none!

I have two questions for readers:
  • Have you ever used beet trimmings in your stock? I'm curious about the effect it has on the color of the stock -- does it turn raspberry color?
  • Does a vegetable stock effectively harness nutrients, or does the stewing destroy them?

Sunday, March 22, 2009

Crockpot Poultry Stock

During my stint in the Peace Corps, I lived with a family in rural Central Asia and noticed that very little goes to waste. There are no grocery stores that provide you with the choice of paper or plastic for free. If you want to carry your groceries home, you either brought a bag with you or bought once in the bazaar. Similarly, food and household items rarely come in packaging. What packaging made it home was either saved and repurposed, or (what little there was) burned in the oven to bake bread.

Bread was eaten until it was gone, and although I never saw moldy bread, we ate our fair share of hard, almost-stale bread. Food scraps were deposited in a bucket that doubled as the cow's trough. It was difficult to waste food.

Here, it is much easier. Without a cow in the backyard or a wood-burning oven, I attempt to use every food scrap possible, but certainly come up short (I have no qualms about throwing away fat); and I can't directly repurpose every piece of paper that comes in the door, but just hope that my diligent recycling makes some sort of difference. As a novice environmentalist living in a rented house, I haven't yet delved into the world of composting. As with many environmentally responsible undertakings, I feel as though I need to know more about composting and I need some capital to start the project. I haven't yet gotten around to acquiring either, so when the opportunity to make a turkey carcass into another meal presented itself last Thanksgiving, I was excited to give it a try. It is incredibly easy, and no carcass has been wasted in the Green house ever since!

I started by adapting a Joy of Cooking recipe for stock, cooking the following ingredients on low for 10 hours:
  • Turkey carcass / bones
  • 1 onion, chopped
  • 1-2 carrots, chopped
  • 1 celery rib, chopped
  • 1 bay leaf
  • 1 bouquet garni (a combination of fresh herbs tied in a cheesecloth)
  • A few peppercorns
  • 6-8 cups of water, or enough to just cover the ingredients
The result was fairly fatty, which I later learned (after reading the "about" section in Joy of Cooking) was because I included the skin in the stock. I was under the mistaken impression that stock was supposed to have some fat in it. Not so! Strip the carcass of any skin and fat that you can. Otherwise, you will have a fatty stock on your hands and it will be a little ... er ... greasy. Yuck!

I have discovered four ways to reduce the fat in your stock:
  1. Trim all the fat and skin from the carcass.
  2. Cool the stock and scrape the fat off of the top.
  3. Use a fat skimmer when the stock is done. You will need to strain the stock anyway, so the fat skimmer can double as a strainer. I, however, couldn't get the hang of this method when I used my simple skimmer, so I bought a fat separator, which I think is the lazier (*ahem* more efficient *ahem*) method.
  4. Use a fat separator that has a strainer. Not only is it ... er ... more efficient, I think it's just cool how it works: With the stopper in the spout, the spout stays dry; with the stopper out, only the water-based liquid rises through the spout. The fat stays at the surface and out of the spout until it's almost empty. In the photo below, I think I did a fairly decent job of keeping the fat out of the ingredients, because the line at the top is pretty thin.
Stopper In


Stopper Out


Since that first time, I have made stock a few times and learned that improvisation is fine. I never include the celery -- just because I never have it on hand -- and use dried herbs (thyme and oregano) instead of putting together a fresh bouquet garni. Beware your main ingredient, however: Last week, Mr. Green smoked a Jamaican jerk-flavored chicken on the grill and that carcass yielded a spicy stock. I added it to reconstitute a ginger butternut squash soup I made and froze earlier in the month and it destroyed the delicate ginger taste of the soup. Don't get me wrong -- it was still a nicely flavored soup -- just not the flavor I was aiming for!

I have now gotten into the habit of getting out my crockpot whenever getting a chicken ready for the oven or grill. Once those giblets come out, they go straight to the crockpot, soon a few carrots and an onion join them, then the chicken; and I cook the stock overnight. In the morning, I divvy up the stock into freezer or fridge containers. I try to cool them quickly so they don't raise the temperature in the freezer or fridge and don't sit too long on the counter at a bacteria-inducing temperature.

This is a great way to turn one meal into two or three distinct meals -- the first being the roasted /grilled chicken -- and the stock and meat can easily be converted into:
  1. Chicken Barley Soup (prep: 40 minutes, due to barley cooking)
  2. Chicken with couscous, onions, and raisins (prep: 15 minutes)
  3. Salad with chicken (prep: as long as it takes you to chop up the salad vegetables!)
Mr. Green smoked another chicken (seasoned with lemon, garlic, and rosemary) the other night ... please share other quick meals for roasted chicken and chicken stock so I can give them a try -- you may see them here!


Friday, March 20, 2009

Crockpot Tips

Volume: Fill the pot between halfway and two-thirds full. Try getting away with no more than 1 cup of liquid and try broths, wine, or vegetable juice instead of water. If the resulting liquid i too watery, you can reduce it on the stovetop.

Location, Location, Location: Because vegetables take longer than meat to cook, place them at the bottom of the pot so they can stew in the liquid. For delicate vegetables or recipes that cook vegetables for 10 hours or more, seal them in a foil pack and place it on the top layer -- it slows their cooking time and keeps their flavor distinct.

Pre-Pot Prep: Left without direction, crockpot ingredients can take on a dull, "crockpotty" taste that you will recognize whether you slow-cooked a pork tenderloin over potatoes and carrots or borscht with onions, beets, and cabbage. Except for simple recipes like rehydrating beans and simmering stock, it's important to guide the flavor of the meal before placing it in the pot. You can do that by browning the meat in the appropriate seasonings or sauteing the seasonings into the onions. With onions, you can even do that the night before you start your meal, and keep it cool in the fridge overnight. (But storing browned meat that's raw in the middle in the fridge overnight isn't recommended)

Vegetarian Flavor Saver:
Browning meat creates a tasty fond that can be replaced by sauteeing onions in seasoning before adding to the pot. If you are adapting a non-slow-cooker recipe, it's generally safe to triple the onions and seasonings when you saute, as it reduces the volume of the onions and locks in the flavor. For a meat stew or braise, add tomato paste - up to 1/4 cup -- and saute with the onions. Soy sauce is another way to deepen and round out the flavor of a stew without adding any distinctive flavor of its own. If you like mushrooms, try porcini mushrooms, they add a nice flavor and color, but not without a distinctive mushroom flavor.

Keeping it Lean: The best meats for crockpot recipes are marbled with fat; they are delicious and tender when stewed for hours. Lean meats are more susceptible to drying out and will have less liquid to release into the pot when it's cooking. If you substitute a fattier cut of meat for a leaner meat in a particular recipe, use the lesser of the cooking times in the recipe and err on the side of including more liquid than listed in the recipe. Alternatively, if you choose to use the fattier meat in the recipe, brown it beforehand and drain the fat from the skillet, use a fat skimmer or fat separator after the meal is cooked, or scrape the fat off of the top after the stew cools in the fridge.

Adapting Non-Crockpot Recipes: 30 minutes on the stove or in the oven is the equivalent of 1 hour in the crockpot on high, or 2 hours on low. Generally, the low setting cooks at just below a boil and high at just above a boil. Lifting the lid of the crockpot and letting steam escape while it is cooking loses 30 minutes of cooking time. So, if you must lift the lid, add another half hour to the cooking time.

Do Not:
  • Cook dried beans with the recipe -- they need to be rehydrated separately.
  • Cook pasta with the recipe -- cook them separately on the stove until tender and add to the crockpot toward the end of cooking.
  • Add frozen vegetables -- thaw them first so they don't lower the temperature of the other ingredients.
  • Add thawed frozen vegetables in the last hour of cooking.
  • Start with chilled meat unless the liquid you add is boiling
Share your some of your slow-cooker tips!

Thursday, March 19, 2009

Efficient Impliment: Crockpot

Why?
  • Energy efficient: In a 2008 article, Consumer Reports named using a slow cooker as one of 25 Simple Ways to Save, because it is more energy efficient than simmering your food on the stove or firing up an electric oven.
  • Attendance optional: Crockpots are designed to be left unattended so you are free to go to work and return home to a warm meal. Be sure to place it on a sturdy surface, do not put more ingredients in it than it can safely hold if the liquid begins to boil, and be sure that it is a safe distance from items that might be damaged by heat -- including the cord, which should be stretched away from the pot.
  • Harness your inner miser: We all know that dry beans are healthier and cheaper than canned beans, but don't have the time to prepare them? The chef with the crockpot! After a big meal of roasted chicken or turkey, who has the energy to stew the carcass for another meal? The chef with the slow cooker -- s/he can do it in her sleep!
What Type?
Prices for crockpots run the gamut, from as low as $15 to up to $250. The price depends on the size, the number of settings, and whether it has a timer.
  • Timing can be everything: Chefs who dare not leave the house while cooking with a crockpot have no need for a timer. Crockpots with a timer allow the chef a more wiggle-room, in case s/he has a meal bubbling in the crockpot while out and s/he arrives home later than expected, the crockpot will automatically switch to a "warm" setting, which avoids over-cooked or burnt food.
  • Size might be important: The Lil Dipper is the smallest size, weighing in at 16 oz -- good for keeping a dip warm for a party. A meal for the entire family, however, requires at least a 6-quart capacity, and preferably an oval shape if you would like to cook an entire tenderloin or chicken.
  • True one-pot deliciousness: The ultra-efficient model, by All-Clad, has an inner container that can be used on the stovetop, which saves the chef from cleaning a pan otherwise needed to saute onions, etc., before adding them to the crockpot. That model tops the charts in expense, and a kitchen equipment rating organization recently found the browning capability of the insert subpar.
Up next:
Tips and recipes for using your crockpot